2 - Patterns
While numerous charts and candlestick patterns exist within trading frameworks, many fail to provide a significant standalone advantage. This guide will curate and highlight the specific patterns that our team has rigorously evaluated and integrates into our trading strategies due to their proven efficacy.
2.1 - Pin Bars
2.1.1 - Pin Bars Definition

- A pin bar is a Japanese candlestick that has a long wick on one side and a small body.
- A pin bar pattern consists of one price bar, typically a candlestick price bar, which represents a sharp reversal and rejection of price. The pin bar reversal as it is sometimes called is defined by a long tail, the tail is also referred to as a “shadow” or “wick”. The area between the open and close of the pin bar is called its “real body”, and pin bars generally have small real bodies in comparison to their long tails.
2.1.2 - Pin Bars Tips
- Pin bars that form after large movements are often not valid as confluence signals.
- Pin bars that form outside active market hours are often not valid as confluence signals.
- Pin bars that form against the current trend are often weak compared to those that form in the direction of the trend.
- Pin bars should not be taken as reversal signals unless the market has already shown clear signs of reversing.
- Pin bars are considered more powerful if they happen as a result of a reaction from the supply or demand zone.
2.2 - Engulfing Bars
2.2.1 - Engulfing Bars Definition

- An engulfing bar, as the name implies, is any bar that engulfs the bar just before it. That means the highs and lows of the engulfing bar itself will always, as a rule, extend beyond the highs and lows of the bar before it.
- The more prior bars that this bar engulfs the stronger it gets.
- A bullish engulfing bar closes higher than the open, while a bearish engulfing bar closes lower than the open.
2.2.2 - Engulfing Bars Tips
- Engulfing bars are more useful as confluence signals near major swing points.
- A good bullish engulfing bar must not be very big and its closing price must be very close if not the same as its high.
- A good bearish engulfing bar must not be very big and its closing price must be very close if not the same as its low.
- While checking for pin bars and engulfing bars, also check for their fusion: (Engulfing Pin Bars). This candle pattern is not easy to find but when it appears, it is usually a very strong candlestick pattern that must be taken into account when other factors align.
2.3 - Tower Candlestick Patterns
2.3.1 - Tower Pattern Definition
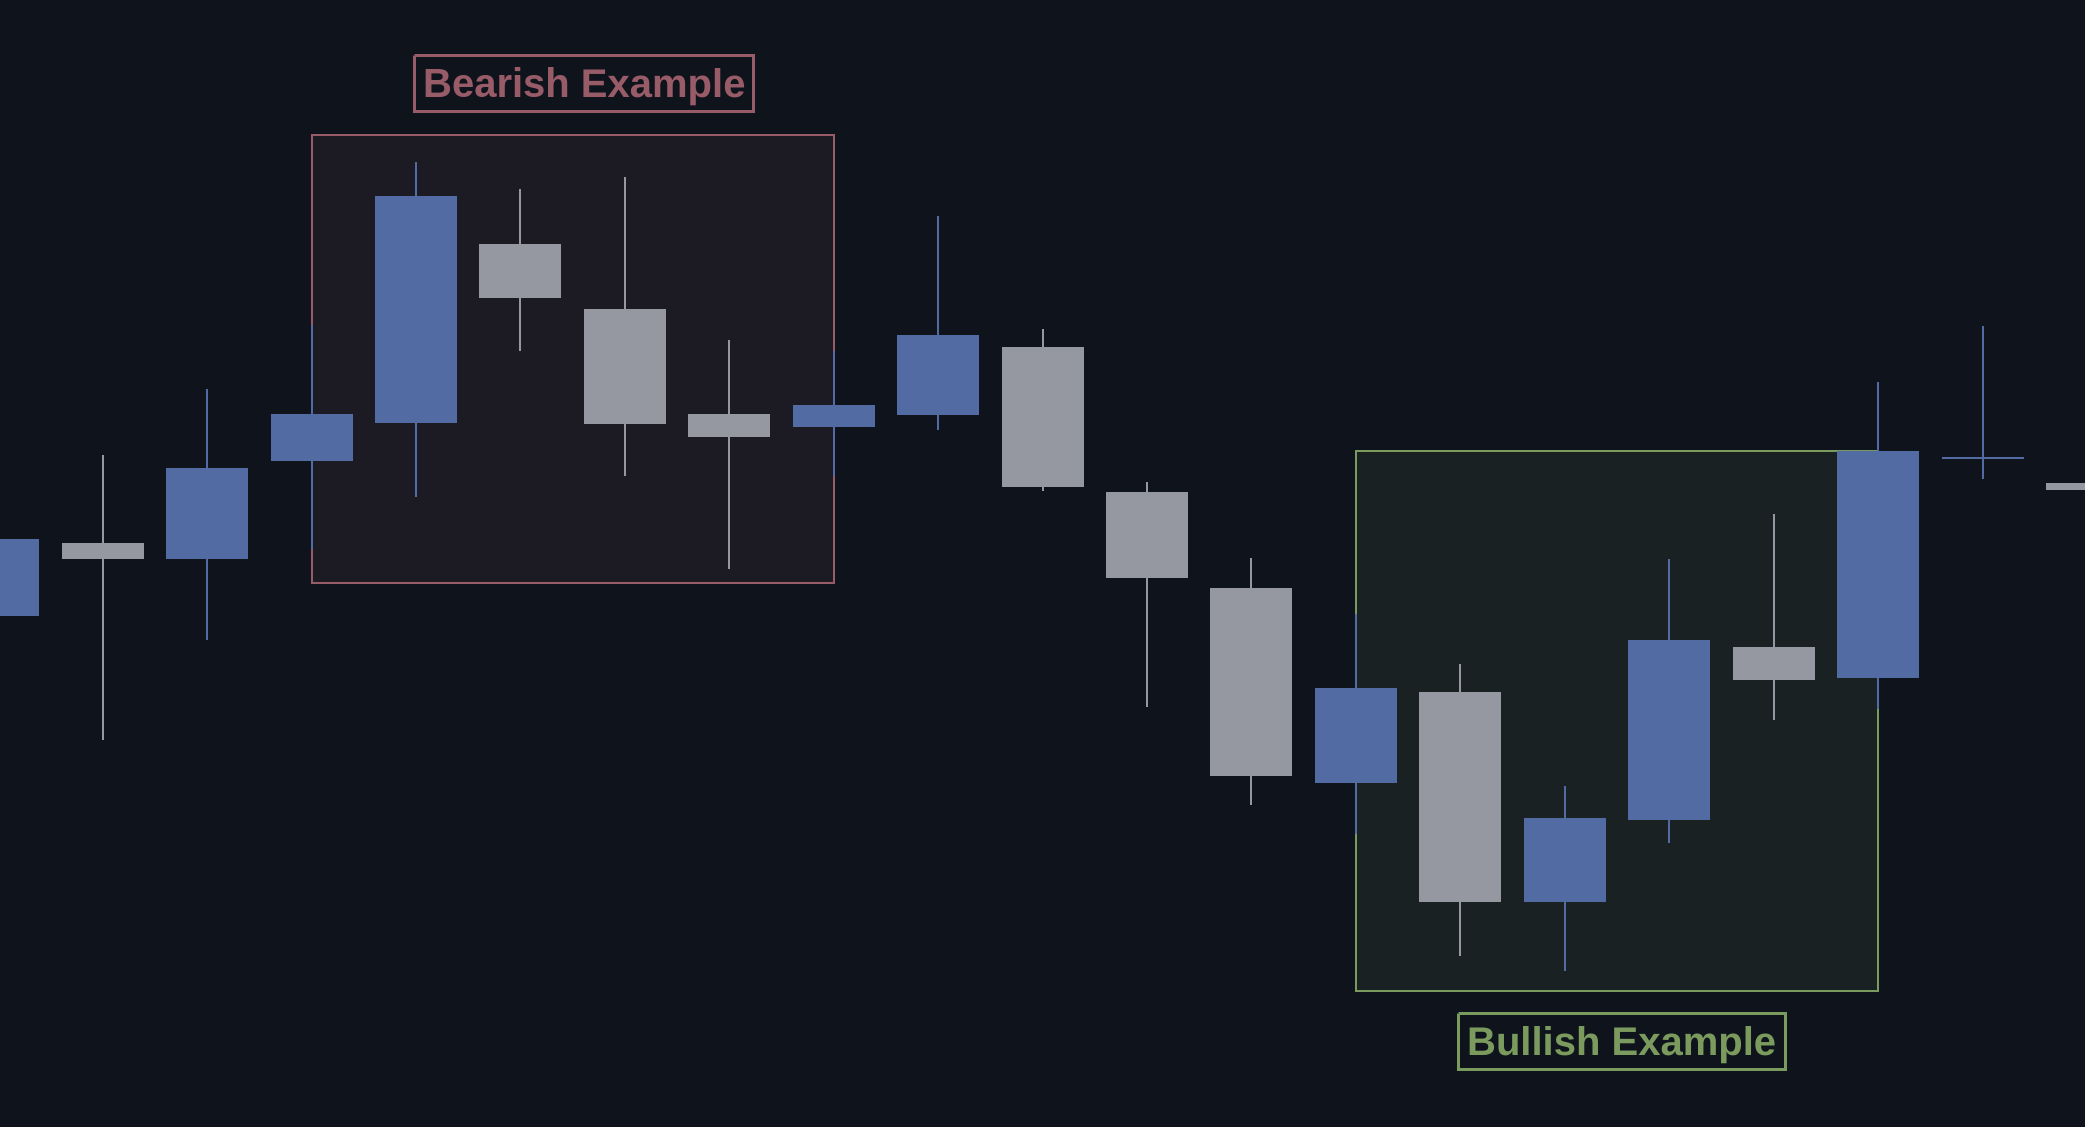
The Tower Top and Tower Bottom candlestick patterns are reversal patterns in trading, indicating a change in the trend direction. The Tower Top pattern suggests a bearish trend reversal, while the Tower Bottom pattern indicates a bullish trend reversal.
2.3.2 - Tower Top Candlestick Pattern

Tower Top Candlestick Pattern: The Tower Top pattern consists of several small bullish (green) candlesticks or a single large candlestick, followed by a slowdown resulting in lateral price movement with small candlesticks. Finally, one or more large bearish candlesticks (red) complete the structure.
2.3.3 - Tower Bottom Candlestick Pattern

Tower Bottom Candlestick Pattern: The Tower Bottom pattern consists of two opposite-color large candlesticks and three to five small base candlesticks. It forms at the bottom of the price chart and indicates a slow change in price trend from bearish to bullish.
Traders should look for these patterns at the end of an extended trend, either uptrend for Tower Top or downtrend for Tower Bottom. To use these patterns effectively, traders should combine them with other technical analysis tools and confirm the reversal with additional signals, such as support and resistance levels or trend lines.
2.3.4 - Classical Tower Pattern Strategy
This section presents a classical tower pattern strategy that can be used to analyze the financial markets.
2.3.4.1 - Indicators
The following indicators are used in this strategy:
- Tower Top and Tower Bottom candlestick patterns: These patterns are used to identify potential reversal points in the market.
- Pivot Points indicator: This indicator is used to identify potential support and resistance levels in the market. Read more about it by clicking here.
2.3.4.2 - Entry Rules
Tower Top Pattern:
- Wait for the formation of the pattern, which consists of several small bullish (green) candlesticks or a single large bullish candlestick, followed by a slowdown resulting in lateral price movement with small candlesticks.
- Enter the trade when the price breaks below the low of the last bearish candlestick in the pattern.
Tower Bottom Pattern:
- Wait for the formation of the pattern, which consists of two opposite-color large candlesticks and three to five small base candlesticks.
- Enter the trade when the price breaks above the high of the last bullish candlestick in the pattern.
2.3.4.3 - Exit Rules
Tower Top Pattern:
- Take profits when the price reaches the next support level or when the Pivot Points indicator shows a reversal signal.
- Place a stop loss above the high of the last bullish candlestick in the pattern.
Tower Bottom Pattern:
- Take profits when the price reaches the next resistance level or when the Pivot Points indicator shows a reversal signal.
- Place a stop loss below the low of the last bearish candlestick in the pattern.
- Use the Pivot Points indicator to identify potential support and resistance levels.
- Confirm the reversal signals provided by the candlestick patterns with other technical analysis tools, such as moving averages or oscillators.
- Practice proper risk management and use the strategy in conjunction with other technical analysis tools for better accuracy.
- The best timeframes for the Pivot Points indicator are 3-minute, 5-minute, and 15-minute.
2.4 - Quasimodo (QML) Chart Pattern
2.4.1 - QML Definition
The Quasimodo pattern, also known as the Quasimodo line/level (QML), is a highly effective chart formation widely used by technical traders to predict trend reversals. This pattern is named after the hunchbacked character 'Quasimodo' because it resembles a hunchback with its high and low peaks. It is a variant of the over-and-under pattern, which often occurs at the end of a trend.
2.4.2 - QML Identification
The Quasimodo pattern is characterized by a sequence of price movements:
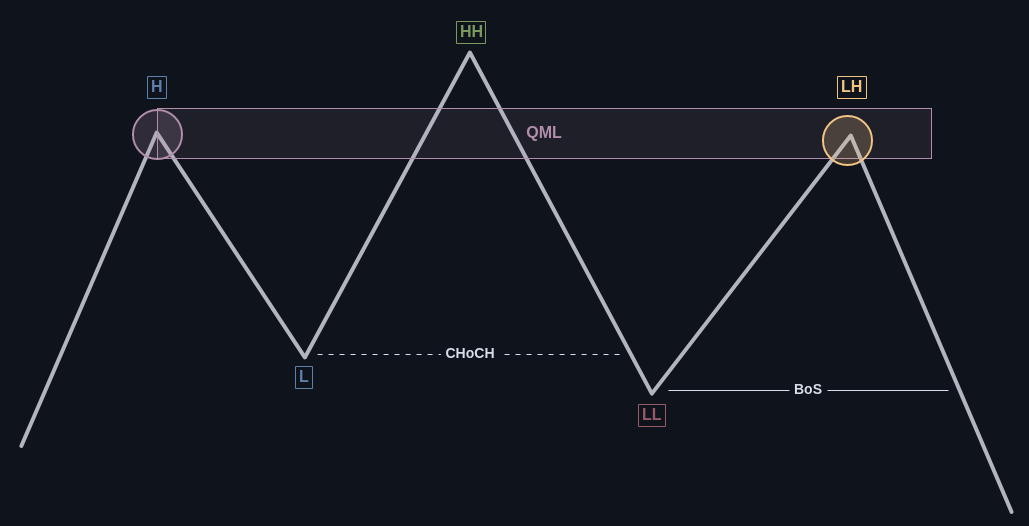
- Initial High/Low: The pattern begins with an initial high in an uptrend or a low in a downtrend.
- Retracement: A retracement follows that breaks the previous minor low in an uptrend or minor high in a downtrend.
- New High/Low: Price then posts a new high or low, exceeding the initial high or low.
- Final Retracement: The final move is a retracement that does not surpass the initial high or low, completing the Quasimodo "hump."
2.4.3 - QML + HTF SnD Zones
Step 1: Establishing the Context with Supply and Demand (SnD) Zones
- Begin by identifying key supply (resistance) and demand (support) zones. These are areas where price has historically reversed direction.
- The ideal scenario for a Quasimodo pattern is near these zones since they add confluence to the reversal signal.
Step 2: Spotting the Quasimodo Formation
- Once a potential supply or demand zone is located, watch for the price to form the Quasimodo pattern.
- The 'head' of the Quasimodo, which is the highest or lowest point, should ideally penetrate the supply or demand zone but not close within it.
Step 3: Confirmation of the Pattern
- For a bullish Quasimodo, the final low should be higher than the initial low, creating a "higher low."
- For a bearish Quasimodo, the final high should be lower than the initial high, creating a "lower high."
Step 4: Entry Points
- Entry is taken after the final retracement is confirmed.
- For a long position, enter after a bullish candle closes above the last low point of the pattern.
- For a short position, enter after a bearish candle closes below the last high point of the pattern.
Step 5: Stop Loss and Take Profit
- Place a stop loss below the final low for long positions and above the final high for short positions.
- Take profit can be placed at the next significant supply or demand zone in the direction of the new trend.
Step 6: Risk Management
- It's crucial to maintain a proper risk-to-reward ratio, often 1:3 or higher.
- Only risk a small percentage of the trading account on any single trade to withstand losses that are inevitable in trading.
Step 7: Advanced Techniques
- Incorporate other technical indicators like moving averages, RSI, or Fibonacci retracements for additional confirmation.
- Volume can also be a good indicator; higher volume on the breaking points of the Quasimodo pattern can indicate stronger signals.
- Patience is key; not all patterns will be perfectly formed or result in a reversal.
- Backtesting the strategy on historical data can help in understanding the effectiveness of the pattern in different market conditions.
- Consider economic news releases or other fundamental factors that might affect the validity of technical patterns.
2.5 - Daily Timeframe Candlesticks Patterns
This guide provides traders with a structured approach to interpreting candlestick patterns on daily timeframe charts. By categorizing candlestick formations into four key areas – continuation, reversal, consolidation, and indecision – traders can gain insights into market sentiment and potential future movements. It's important to note that while these patterns offer valuable clues, they should be considered alongside other technical indicators and market context for a more comprehensive analysis.
2.5.1 - Potential Continuation Patterns

- Breakout: Indicates a continuation of the current trend when a candle closes above the previous day's high or below its low.
2.5.2 - Potential Reversal Patterns

- Rejection: Suggests a potential reversal when wicks surpass the extremes of the previous day but the body closes within the previous candle's range.

- Gap: A gap up or down between two candles can signal a strong shift in sentiment, often leading to a trend reversal.
2.5.3 - Potential Consolidation

- Inside Bar: Implies market consolidation or a pause in the trend, characterized by the high and low of a candle being contained within the body of the previous day's candle.
2.5.4 - Potential Indecision in the Market

- Harami: Indicates market indecision, with the body of the current candle within the previous candle and the wicks surpassing the high and low.

- Doji: A Doji candle, where the open and close are almost at the same level, typically reflects market indecision, especially when considered in relation to the preceding candle.

- Equal Highs/Lows: Suggests either strong resistance/support at those levels or indecision when both candles share the same high or low.
2.6 - Daily Timeframe Shift Sweeper Pattern
The Shift Sweeper Pattern is a nuanced candlestick formation designed to aid traders in forecasting upcoming market trends by analyzing the behavior of three specific daily timeframe candles. This pattern is adept at signaling both potential continuations and reversals, with a focus on predicting the movement of the fourth candle based on the configurations of its predecessors.
Pattern Formation for Both Scenarios:
-
First Candle: Establishes the initial direction of the market. This candle is bullish in scenarios anticipating a bearish reversal, and bearish when predicting a bullish reversal, setting the stage for the unfolding pattern.
-
Second Candle: May exhibit either a bullish or bearish disposition but is constrained by a key rule: in bullish scenarios, it must not close below the first candle's low, and in bearish scenarios, not above the first candle's high. This condition suggests that the market is either maintaining its momentum or consolidating, without giving off strong reversal cues.
-
Third Candle: Acts as the counter to the first candle, marking a pivotal shift in market sentiment. For a pattern priming for a bullish turn, this candle is bearish, closing lower than its opening price. Conversely, in a setup gearing towards bearishness, it is a bullish candle, closing above its opening price.
-
Fourth Candle (Prediction): The crucial forecast is that the fourth candle will decisively 'sweep' or breach the extremity (either the low or high) of the third candle. This movement is indicative of a continuation in the shift of sentiment highlighted by the third candle, reinforcing the pattern's predictive insight.